4. Cnc25D API Outline Creation
4.1. Cnc25D outline
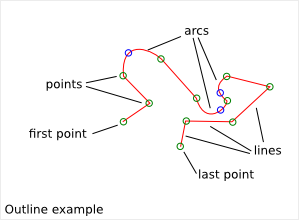
Cnc25D helps you to work on outline before extruding it into 3D parts. Cnc25D outlines are defined in the XY-plan and consist of a series of lines and/or arcs. A line is defined by a start point and an end point. An arc is defined by a start point, a passing-through point and an end point.
Manipulating Cnc25D outline consists of working on 2D points. This requires much less CPU resources as invoking a complete 3D software. If you want to create other types of curve than lines or arcs, you must approximate those curves with multiple small lines.
Cnc25D outline vocabulary:
- outline: a series of segments
- segment: a line or an arc
- start-point: the starting point of a line or an arc
- end-point: the ending point of a line or an arc
- middle-point: the passing-through point of an arc (it doesn’t have to be in the middle of the arc)
- first-point: the start point of the first segment of an outline
- corner: the junction between two consecutive segments.
- corner-point: the end-point of the previous segment or the start-point of the next segment
- rbrr : the router_bit radius request (how to transform a corner to do it millable by a router_bit of radius R?)
- closed outline: True if the end-point of the last segment is equal to the first-point
- outline orientation: Counter Clock Wise (CCW) or Clock Wise (CW) (this has a meaning only for closed outline)
- curved outline: outline representing a curve. The outline approximates the curve with some discrete points.
- tangent inclination: angle between the (Ox) direction and the oriented tangent of a point of an oriented curve.
- outline format A: pythonic description of an outline used as argument by the function cnc25d_api.cnc_cut_outline()
- outline format B: pythonic description of an outline returned by cnc25d_api.cnc_cut_outline() and used as argument by cnc25d_api.outline_arc_line()
- outline format C: pythonic description of a curved-outline used as argument by the function cnc25d_api.smooth_outline_c_curve()
- figure: list of format-B outlines

4.2. Cnc25D outline format A
In short, the Cnc25D outline format A is a list of list of 3 or 5 floats.
The purpose of the Cnc25D outline format A is to define your wished outline. In addition to the start, middle and end points of the segments, you define for each corner the associated rbrr. That means that you can request different router_bit radius for each corner. In general, you will set the same value for all corners of your outline. But you also have the flexibility to set different rbrr for each corner.
The first element of the outline format A list is the first-point. It is defines by a list of 3 floats: X-coordinate, Y-coordinate and the rbrr of the first-point.
The second element of the outline format A list is the first segment of the outline. If the first segment is a line, it is defines by a list of 3 floats: end-point-X, end-point-Y and the rbrr of the end-point of the segment. If the first segment is an arc, it is defines by a list of 5 floats: middle-point-X, middle-point-Y, end-point-X, end-point-Y and the rbrr of the end-point of the segment.
All elements of the outline format A list define a segment except the first element that defines the first-point. An outline composed of N segments is described by a list of N+1 elements. A segment is defined by 3 floats if it is a line or 5 floats if it is an arc. The start-point of a segment is never explicitly defined as it is the end-point of the previous segment. If the X and Y coordinates of the end-point of the last segment are equal to the X and Y coordinates of the first-point of the outline, the outline is closed.
rbrr (a.k.a router_bit radius request) defines how cnc25d_api.cnc_cut_outline() must modify a corner:
- if rbrr = 0, the corner is unchanged
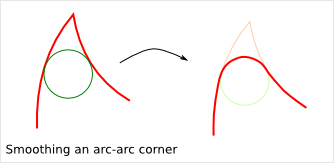
- if rbrr > 0, the corner is smoothed to fit the router_bit radius rbrr
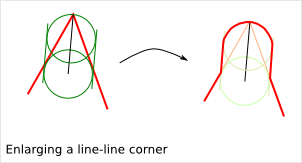
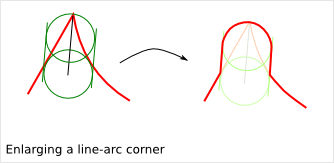
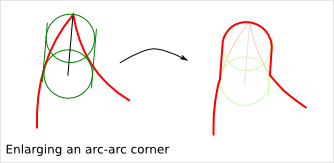
- if rbrr < 0, the corner is enlarged to fit the router_bit radius abs(rbrr)
Good practice: If the outline is closed, the rbrr of the last segment must be set to zero. If the outline is open (i.e. not closed), the rbrr of the first-point and the rbrr of the last segment must be set to zero.
The outline format A can be defined with list or tuple. The orientation of a closed outline can be CCW or CW.
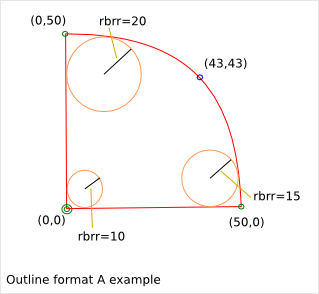
outline format A example:
outline_A = [
  [  0,  0, 10],            # first-point
  [ 50,  0, 15],            # horizontal line
  [ 43, 43,  0,  50, 20],   # arc
  [  0,  0,  0]]            # vertical line and close the outline
4.3. Cnc25D outline format B
The Cnc25D outline format B is either a circle or a general outline.
In short, a format-B circle is a list of 3 floats (center-x, center-y, radius). The Cnc25D general outline format B is a list of list of 2 or 4 floats.
The purpose of the Cnc25D general outline format B is to define an outline with points. In the general case, this is a simplification of the outline format A, where the rbrr information is removed.
The first element of the general outline format B list is the first-point. It is defines by a list of 2 floats: X-coordinate, Y-coordinate.
The second element of the general outline format B list is the first segment of the outline. If the first segment is a line, it is defines by a list of 2 floats: end-point-X, end-point-Y. If the first segment is an arc, it is defines by a list of 4 floats: middle-point-X, middle-point-Y, end-point-X, end-point-Y.
All elements of the general outline format B list define a segment except the first element that defines the first-point. An outline composed of N segments is described by a list of N+1 elements. A segment is defined by 2 floats if it is a line or 4 floats if it is an arc. The start-point of a segment is never explicitly defined as it is the end-point of the previous segment. If the X and Y coordinates of the end-point of the last segment are equal to the X and Y coordinates of the first-point of the outline, the outline is closed.
The general outline format B can be defined with list or tuple. The orientation of a closed outline can be CCW or CW.
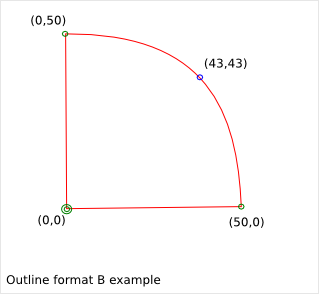
general outline format B example:
outline_B = [
  [  0,  0],            # first-point
  [ 50,  0],            # horizontal line
  [ 43, 43,  0,  50],   # arc
  [  0,  0]]            # vertical line and close the outline
4.4. Cnc25D outline format C
In short, the Cnc25D outline format C is a list of list of 3 floats.
The purpose of the Cnc25D outline format C is to define a curved-outline with points and tangents. This is an extension of the outline format B, where the tangent inclination is added at each point. This format must be preferred to described a curved-outline.
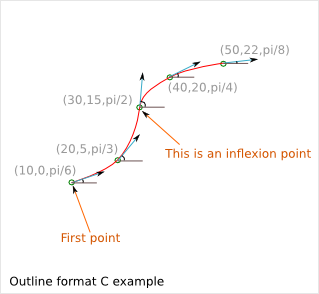
Each element of the outline format C list is a curve sampling point. It is defines by a list of 3 floats: X-coordinate, Y-coordinate and the tangent inclination angle. The first element of the outline format C list is the first-point. The outline is oriented from the first-point to its last point. The tangent inclination is the angle (included in [-pi, pi]) between the (Ox) direction vector and the oriented curve tangent at the considered sampling point.
The outline format C can be defined with list or tuple.
outline format C example (the X,Y coordinates and the tangent inclination angle are rounded for a better readability):
outline_C = [
  [ 10,  0, math.pi/6],    # first-point
  [ 20,  5, math.pi/3],
  [ 30, 15, math.pi/2],
  [ 40, 20, math.pi/4],
  [ 50, 22, math.pi/8]]
The Cnc25D outline format C is used as argument by the function cnc25d_api.smooth_outline_c_curve().
If the curved-outline contains one or several inflexion points, it is recommended to chose those points as sampling points. Thus the function cnc25d_api.smooth_outline_c_curve() is able to smooth the entire curved-outline. Otherwise segments containing an inflexion point are leave as line by the function cnc25d_api.smooth_outline_c_curve().
4.5. The function Cnc_cut_outline()
cnc25d_api. cnc_cut_outline( list, string )4.5.1. cnc_cut_outline purpose
If you work with 3-axis CNC, your free XY-path gets actually some constraints due to the router_bit diameter. Real inner angle can not be manufacture and must be replaced either by a smoothed angle or an enlarged angle.
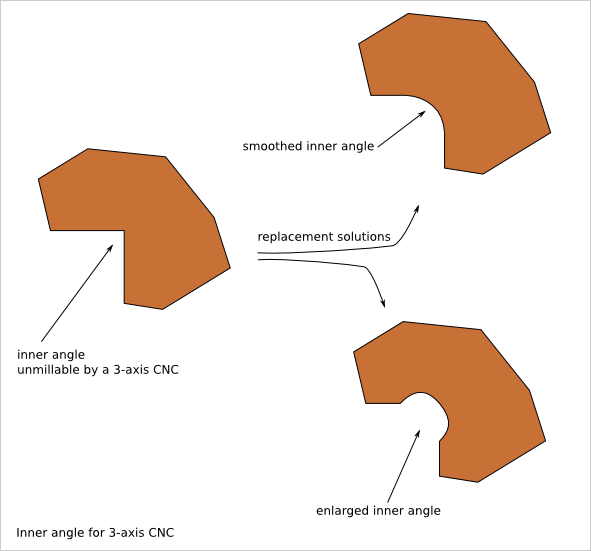
The cnc_cut_outline function aims at converting an outline defined by a list of points into an outline with lines and arcs makable by a 3-axis CNC. For each point, you choose if you want to enlarge the angle, smooth it or leave it sharp.
Look at the CNC Cut Outline Details chapter to get more information on when you should enlarge and when you should smooth a corner angle.
4.5.2. cnc_cut_outline usage
The cnc_cut_outline() function provides three possibilites as corner transformation: smooth, unchange, enlarge.
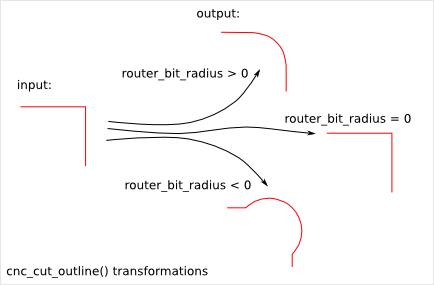
If rbrr (a.k.a. router_bit radius request) is positive, the angle is smoothed. If rbrr is negative, the angle is enlarged. If rbrr is zero, the angle is unmodified.
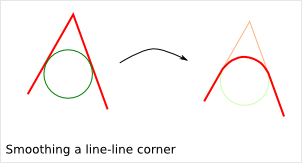
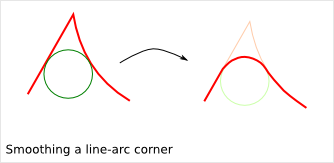
Smoothing a corner is a closed problem: there is only one arc of radius R (= rbrr) that is tangent to the two adjacent segments.
Enlarging a corner is an open problem: there are several arcs of radius R (= rbrr) that can clear the wished outline. Cnc25D chose the arc of radius R (= rbrr) of which the center is on the line defined by the corner-point and the center of the associated smoothed corner. If you want an other solution, you can modify slightly your wished outline (in format A) to influence the final result as shown in the next paragraph alternative enlarged corner.
Notice that the interior of an closed outline is not influencing the process of smoothing or enlarging a corner. Only the local geometry (namely the two adjacent segments) influence this process.
The cnc_cut_outline() function needs as argument an outline of format A and returns an outline of format B. The format B outline can easily be converted into a FreeCAD Part Object, that can be after some conversions be extruded:
my_outline_A = [
  [  0.0 ,  0.0,  0.0],   # this corner will be leaved sharp
  [ 20.0 ,  0.0,  5.0],   # this corner will be smoothed
  [  0.0 , 20.0, -5.0]]   # this corner will be enlarged
my_outline_B = (cnc25d_api.cnc_cut_outline(my_outline_A, "demo_my_outline_A")
my_part_face = Part.Face(Part.Wire(cnc25d_api.outline_arc_line(my_outline_B, 'freecad').Edges))
my_part_solid = my_part_face.extrude(Base.Vector(0,0,20))
Look at the script cnc25d_api_example.py that you can generate with the executable cnc25d_example_generator.py for a more complete example.
If the requested router_bit radius is too large, the corner transformation may not be applied because of geometrical constraints. You get a warning or error message containing string set as argument. A good practice is to set string to the function name that calls cnc_cut_outline(). So you can find out which outline is not compatible with the requested router_bit radius in case of error. Below an example of warning message due to a too large router_bit radius. Thanks to the string, we know that the outline issue is located in the plank_z_side function:
WARN301: Warning, corner plank_z_side.1 can not be smoothed or enlarged because edges are too short!
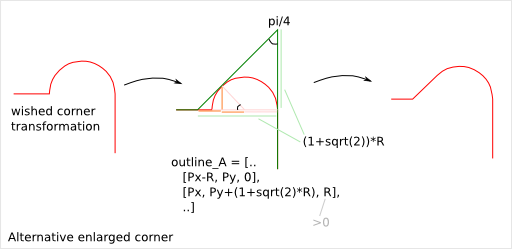
4.5.3. Alternative enlarged corner
As the problematic of enlarging a corner doesn’t have a unique solution, you may want an other enlarging corner than the default one proposed by cnc_cut_outline(). For example, you may want to enlarge a corner without milling one of the adjacent segment. By changing the input outline, you can achieve it:
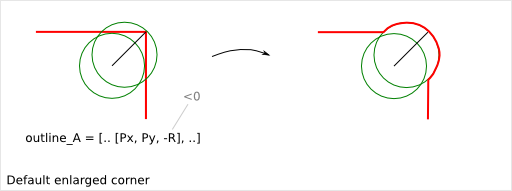
For comparison, the default result would be:
4.6. The function smooth_outline_c_curve()
cnc25d_api. smooth_outline_c_curve( list, float, float, string )It reads a format C outline and returns a format B outline with the following characteristics:
- the outline is made out of arcs
- the outline goes through the sampling points
- the outline tangent at the sampling points has the requested direction (a.k.a. tangent inclination)
- the outline tangent is continuous
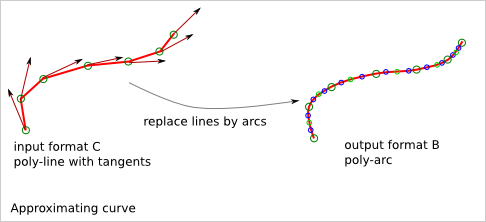
With an input format C outline of (N+1) points (i.e. N segement), the function smooth_outline_c_curve() returns a format B outline of 2*N arcs. If a segment contains an inflexion point, the arcs are replace by a line. If input points are aligned or almost aligned, arcs are also replaces by lines.
If the input curve contains inflexion points, choose these points as sampling points. This way, the function smooth_outline_c_curve() can returns an approximated outline containing only arcs. In this case, the outline tangent is continuous along the full path.
To approximate a mathematical or free-hand curve, it is better to use arcs than lines because with arcs you can keep the property of continuous tangent. Most of the 3-axis CNC can handle arcs at the motor driving level. So this function helps you to integrate your curve into a high quality workflow.
float ai_precision: defines the minimal angle to consider that points are not aligned and arcs must be created. Typical value: pi/1000.
flaot ai_router_bit_request: defines the minimal radius of curvature of the returned outline. If a computed arc has a radius smaller than ai_router_bit_request, a warning message is printed without changing the returned outline. Set ai_router_bit_request to your router_bit radius. If you get warnings, create a more regular curve or choose a smaller router_bit.
string ai_error_msg_id: this string is added in the error message and helps you to track bugs.
For more details on the implementation of smooth_outline_c_curve(), read the chapter Smooth Outline Curve Details
4.7. The function smooth_outline_b_curve()
cnc25d_api. smooth_outline_b_curve( list, float, float, string )It reads a format B outline and returns a format B outline with the same characteristics as smooth_outline_c_curve().
The function smooth_outline_b_curve() guests the curve tangent at each sampling point according to the previous and following sampling points and then computes the approximated outline with arcs using smooth_outline_c_curve(). The result is poorer than using smooth_outline_c_curve() because the curve tangents are approximated. Use this function only when you can not get the tangent inclinations at the sampling points.
4.8. Other outline help functions
Cnc25D outline format A and B reduce the description of an outline to the 2D coordinates of points. That’s a drastic reduction of the amount of Data and still keeping the description accurate. But for complex outlines, a large list of point coordinates might become unreadable. It is preferable, to split a large list into comprehensive smaller sub-paths and then concatenate them. Often patterns will be used several times for an outline with some slight modifications like position (of course), scale, mirror or rotation. This is the purpose of the outline help functions.
The outline help functions accept as argument the Cnc25D outline format A and the Cnc25D outline format B and return the outline with the same format:
cnc25d_api.outline_shift_x(outline_AB, x-offset, x-coefficient)
cnc25d_api.outline_shift_y(outline_AB, y-offset, y-coefficient)
cnc25d_api.outline_shift_xy(outline_AB, x-offset, x-coefficient, y-offset, y-coefficient)
cnc25d_api.outline_rotate(outline_AB, center-x, center-y, rotation_angle)
cnc25d_api.outline_close(outline_AB)
cnc25d_api.outline_reverse(outline_AB)
4.8.1. outline_shift
cnc25d_api. outline_shift_x( list, x-offset, x-factor )cnc25d_api. outline_shift_y( list, y-offset, y-factor )cnc25d_api. outline_shift_xy( list, x-offset, x-factor, y-offset, y-factor )The definition an outline can be quiet long and tedious. It might be useful to split a long list of points into several small sequences and concatenate them into one big list using the .append() and .extend() methods. Often it happens that sub-sequence patterns appear several times in one outline either shifted or mirrored. The functions outline_shift_x, outline_shift_y and outline_shift_xy can be use to help the reuse of outline sub sequences. Let’s look at the following example.
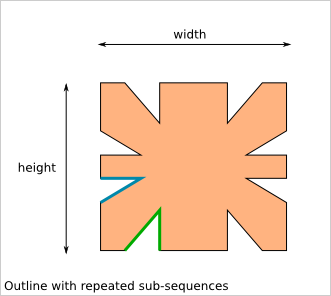
If we want to define this outline brutally, we must create a list of 28 points. But we can also define first the blue and the green sub-sequences, which are each 3 points and create the complete outline out of them:
# We follow the points in the counter clock wise (CCW)
green_sequence = [
  [ 10,  0, 0],
  [ 20, 10, 0],
  [ 20,  0, 0]]
blue_sequence = [
  [  0, 25, 0],
  [ 10, 25, 0],
  [  0, 20, 0]]
width = 100
height = 80
my_outline = []
my_outline.append([0, 0, 0])
my_outline.extend(blue_sequence)
my_outline.extend(outline_shift_x(blue_sequence, width, -1))
my_outline.append([width, 0, 0])
my_outline.extend(outline_shift_x(green_sequence, width, -1))
my_outline.extend(outline_shift_xy(green_sequence, width, -1, height, -1))
my_outline.append([width, height, 0])
my_outline.extend(outline_shift_xy(blue_sequence, width, -1, height, -1))
my_outline.extend(outline_shift_y(blue_sequence, height, -1))
my_outline.append([0, height, 0])
my_outline.extend(outline_shift_y(green_sequence, height, -1))
my_outline.extend(green_sequence)
This code is easier to maintain.
4.8.2. outline_rotate
cnc25d_api.outline_rotate(outline_AB, center-x, center-y, rotation_angle)
return outline_AB
It applies a rotation of center (x,y) and angle rotation_angle to each points of the input outline.
4.8.3. outline_close
cnc25d_api.outline_close(outline_AB)
return outline_AB
If the input outline is open, it closes it with a straight line (from the end-point of the last segment to the first-point).
4.8.4. outline_reverse
cnc25d_api.outline_reverse(outline_AB)
return outline_AB
It reverses the order of the segments. If the outline is closed, that reverses its orientation (from CCW to CW or opposite). Notice that the .reverse() python method would not return a valid outline (format A or B) because of the first-point and the middle-point of arcs.
4.9. ideal_outline()
cnc25d_api.ideal_outline(outline-AC, error_mark_string)
return outline-B
The function ideal_outline() lets you quickly convert a format-A or format-C outline into a format-B outline by dropping the additional information contained in the format-A and format-C. The returned format-B outline is probably to suitable for a 3-axis CNC. But you can display this ideal or wished outline in the Tkinter GUI to check the outline construction.